Sunday, December 19, 2010

Merry Making!


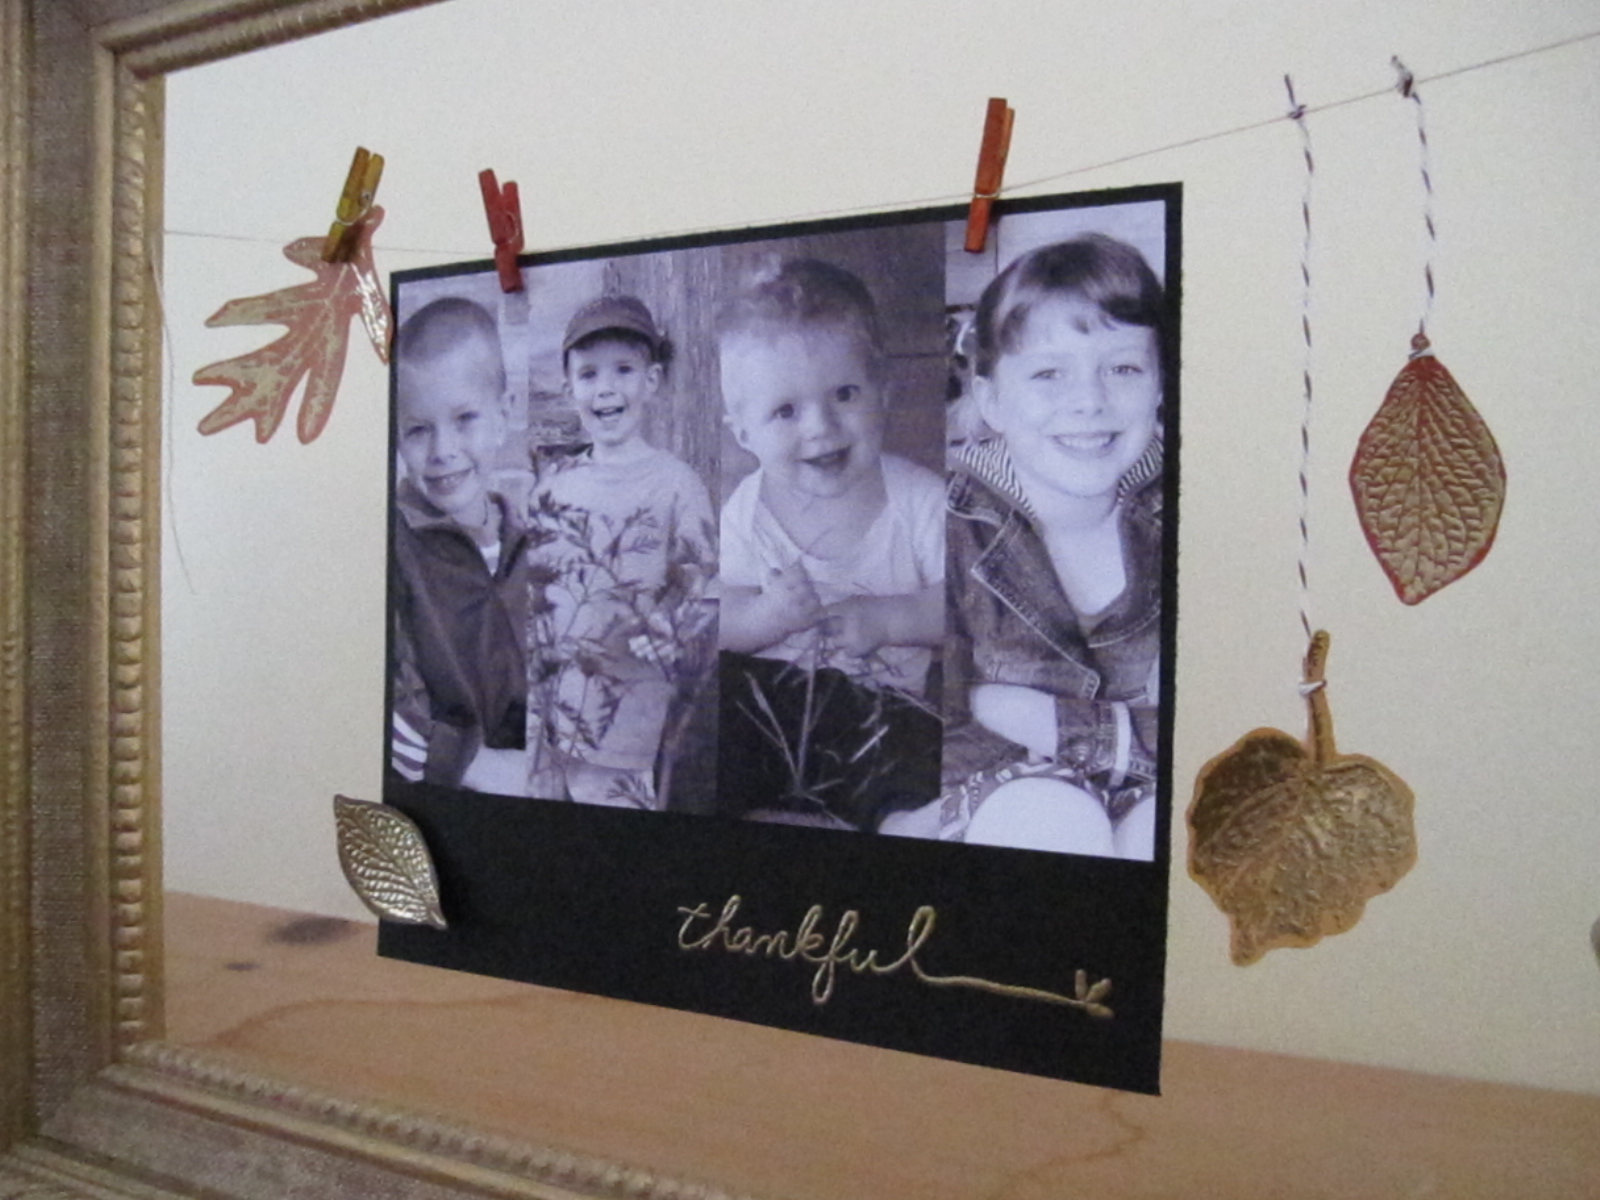
We've been busy little elves this month, baking and crafting
up a storm - oh, SO much fun!! This is the display on top
of our mantel. I made the banner with the kids' poster paper
and a permanent marker (and a little distress ink to give the
edges some definition). I love the way it looks but, more
importantly, the way it keeps us focused on what's really
important this season. Often in the midst of a last-minute
cleaning, gift-making, packing, wild-children-whooping-and-
racing-through-the-room rush I'll look up and see our banner...
It's such a good heart-check and reminder. Is what I'm doing
bringing Him glory? Where is my heart in the midst of all
the preparation...stressing out over the details or rejoicing
in the celebration of our Saviour's birth?

Alas, with all that said, here's some of the merry-making
we've been up to...

Gift basket with homemade cookies, boeterkoek,
canning and some chocolate-y goodness.
Lots of stamping and cute twine on the tags.
Love it!

Gracie Jo LOVES using my stamping stuff and
did such a cute job making Christmas cards for
all of her classmates and teachers.
A girl after my own heart!!

Even Silas joined us down in the Scrapyard
and made this card (using the Snow Swirled
stamp set from SU!) for his best friend, Thorn.
Isn't he just so sweet?


I've been wanting to try and make one of these flowers made
out of scrap fabric forever and a girlfriend's birthday a couple
weeks ago was the perfect excuse to finally give it a try.
I wasn't totally thrilled with the final result...I'll do a
couple things differently next time... but I'm happy I
finally did it. And, judging by the look on Gracie Jo's
face when she tried it out for me, I'll be making a few
of these for her stocking I think :)

Gingerbread cupcakes.
With marshmallow cream cheese frosting.
And peppermint dust.
Seriously??
We made them for the teachers, our local (AWESOME) librarians
and the bus driver. I can't tell you how difficult it was to
not just eat them all myself. SO GOOD!!!
I packaged them all in little mason jars wrapped with
baker's twine, Christmas-y fabric and a cute little
tag (didn't get a picture because I was definitely finishing
them in a mad rush on the last day of school...)
but I think they just might become a tradition
around here - if I don't eat them all before I
can give them away!

And here's the teacher's cards that went with their
gift certificates. The school has a really awesome program
where the teachers all choose a project to sponsor and instead
of buying them Christmas presents, you make a donation.
This year the money went to a program that builds
shelters for families in Haiti. How cool is our school?

I got the apple stamp in one of my Unity Kit of the Months
and have been wanting to make a teacher card with it.
Not really a traditional Christmas card, but I thought
the teachers would like it :)

Anyways, hope your holiday preparations are bringing
joy and you're finding a good balance as you celebrate
this Christmas.
Lots of love and all the blessings of the season,
from the Scrapyard
xo

Happy Birthday, Grandma!

I've been a bit behind in posting here lately...
The busyness of the season is definitely upon us!
Anyways, I made this card at the beginning of the month
for Pete's grandma's birthday. I saw a card like
this in a Papercraft's magazine that I borrowed
from the library and knew it would make a
perfect quick card when I was 'in a pinch'.


I'm so happy with how it turned out! And it really
was super quick to make - I had the whole card
finished (even added some paper and stamping to the
inside) in less than 20 minutes. I know if I made some
like this again, they could easily be a 10-minute card.

Thanks for stopping by! I'll try and share some of our
Christmas creations soon...
Hope you're feeling the blessings of this season.
xo
Supplies:
Cardstock, Ink, Embossing Folder, Twill Tape - SU!
Wishing You stamp - Verve Stamps
Patterned Paper - Basic Grey

Sunday, November 28, 2010

I did it!

Updated:
I added some details and a supply
list for all you curious cats out there
....namely Marnie :)


November Hazzard County Card Challenge...CHECK!!
Unbelievable, people. I truly can't believe it.
The fact that I actually got it completed before the
end of the month is unreal. The fact that I actually
completed this challenge is even more amazing.
Did you check it out?
Marnie brought out the big guns for this one.
Seriously? Stinkin' hard!
I would have never, in a million years!, picked out this
colour combo: black, blue, grey/silver and white.
I can't remember the last time I used black on
a card...so I was totally stumped when it came to
this one. For the life of me I couldn't come up with
anything. And then, it hit me!! I was practicing
some Christmas songs with my little girl for
the Sunday School Christmas program when
I realized that sheet music is white and BLACK!
And it's beautiful.
Suddenly, I couldn't wait to make this card.
So, after that incredibly long introduction...
November's Challenge Card!

Totally. in. love.
Marn, I can't thank you enough for pushing
me outside of my comfort zone. So glad
for these challenges because they
a) get me into the scrapyard
b)force me to try things I wouldn't on my own

To make the sheet music I used this stamp
that I just got at Unity (thanks to a 40% off sale
and free shipping - love a good deal!) which
I think is going to be my new favorite.
I stamped it in black on Whisper White
card stock and then distressed the edges
with my distressing tool and Old Paper
distress ink. I love the aged look it gave it.
The black fibre was from my 'stash'.

The center panel is Whisper White, layered on
Basic Gray, stamped in Baja Breeze
which I embossed with clear e.p. just to make
it 'pop' a bit. It wasn't quite snazzy enough for
me so I stamped the snowflake a second time,
cut out the center, covered it with Crystal Effects
and then went to town with the Dazzling Diamonds.
Topped it off with a Baja Breeze button tied with
a bit of twine and 'Wah-lah!' Lovin' it!

Thanks for an awesome challenge, Marnie!
One Christmas card down, 74 to go...

Saturday, November 6, 2010

Our Fall Mantel

I always like to do a seasonal decoration on our mantel
and when I saw this idea on the Hero Arts blog, I knew
exactly what I would do for this fall. I'm already starting
to think about switching it up for winter and Christmas,
so I thought I'd better share this with you quickly
before I take on a whole new season!


I found this frame (with a kitschy oil painting in it) for a
couple bucks at a thrift store. I just popped out the canvas
and stapled a string across the back of the frame.

I embossed the 'thankful' sentiment (Unity's September kit of
the month) with gold embossing powder and the leaves from
SU!'s new French Foliage set (such a BEAUTIFUL set!) onto
more mustard, riding hood red and pumpkin pie cardstock.
Then I used some baker's twine and mini clothespins to attach
everything to the string. Easy-peasy!! I can't tell you how
much I love this. Every time I look at it, it just makes me smile.
We've had a lot of ups and downs this past month, and having
this frame sitting up on our mantel has been a wonderful
reminder for me of how blessed we are, and to keep a
grateful heart in all situations.

But, the snow started falling this week and so I'm already
dreaming of how I'm going to switch this up for winter...
Stay tuned!

Thanks for popping by!

Tuesday, November 2, 2010

October's Challenge card

Well, I'm a bit late posting this, but I did get it done on time!!
It was my Mother-in-law's birthday on Monday, and I knew the
colours in October's inspiration picture were something she would
like. I used a sketch from an old Papercraft's magazine and put
together a little something that seemed just right for her.


Although it's a bit busy, I do like all the layers and
dimension on this card.


I used Crumb Cake, Tangerine Tango, Whisper White and
Garden Green (first time I've used this colour...have had it
for 2 years?...teehee!) cardstock and some Basic Grey patterned
paper. The stitching stamp along the bottom is from Unity (another
freebie!!) and the sentiment is from Verve. Loving the Circular
Sayings set...so versatile! The buttons and twine are PTI, punches
and ribbon are SU!, the rhinestones are from Kaiser Craft and
the doily is from a Dollar Store pack. Phew!

I'm still working on my September challenge...{sheepish grin}
but I haven't given up. Hopefully I can show it to you soon!
Until then, I'm eagerly anticipating November's challenge!
Thanks for visiting and make sure to check out Marnie's
October card
- it's FANTABULOUS!!!

Thursday, October 21, 2010

Happy Birthday, sweet Sister!

It was my sister-in-law's birthday this week and
I needed an extra-special card for her. Not only
does she herself make cards, but she truly does
appreciate the time and thought that goes into
all things handmade. I had sketched out this layout
from one of Jennifer McGuire's cards awhile ago
and knew it would be perfect for Tina's birthday.
Isn't it gorgeous?!?
Sorry, I know it's totally rude and lame to
gush over your own creations, but I just can't
help it. I'm in love with this card. Seriously,
it was very difficult to give it to my sister. Ha!!

Anyways, enough drooling. Onto the details.
I've been watching Jennifer McGuire's Holiday
Thinking Inking videos and wanting to try some of her
techniques. She is the queen of distress inks! So, for the
background, I inked up my Canvas background stamp
from SU! with Old Paper distress ink and then gave
it a good spritz of water with my daughter's spray
bottle. Stamped it onto the Top Note die (which I still
just traced and cut out from the negatives I had
scrounged from stamp club...yes, Margaret, I will
finally put that die in my next order! LOL!) and
then inked up the edges with Vintage Photo and
Walnut Stain. Love the detail and dimension it adds!
I then stamped the ledger from a Unity kit and added
the 'Celebrate' sentiment from PTI. Can you believe
the only stamp I purchased on this card is the Canvas
background? All the others were from goodies
I won....sa-weeeeet!!! Love that.

Always inspired by this awesome gal,
I coloured the flowers by sponging various
colours of ink directly onto the cardstock. For
the orange flowers I used: Pumpkin Pie, Tangerine
Tango and Really Rust and for the blue flower I used
Tempting Turquoise, Taken with Teal and Night of
Navy. I love how they turned out!!
To finish things off I added some rhinestones
and pearls to the centers of the flowers and
tied some twine around the top of the card.
I think this must may be my favorite card yet!
Did I mention it was hard to give it away?
Anyways, thanks for indulging me today! ;)
Hope you're having some lovely adventures
in your own crafty corner of the world.
xo

Soft sympathy...

I needed a sympathy card for our friends, whose
dad passed away. I just wanted something simple
and 'soft' that would let them know we were thinking
of them. I wanted to use the flowers from the 'Upsy Daisy'
set and had seen a really neat tutorial doing shadow
stamping so I thought I would give it a try.

Lots of layers with distressed edges and a few little
butterflies to finish it off. I was very tempted to 'bling'
it up with sparkles and some little diamonds and pearls,
but it didn't seem to suit the occasion. (I'm interested
in your thoughts - is it appropriate to send a heavily
embellished sympathy card, or is that in bad taste?)
Anyways, I thought the end result was very serene
and I hope our friends will feel the comfort and peace
of our Heavenly Father's love during this tough,
tough time. If you have a moment, I know your
prayers would mean a lot to our friends, who are
missing their husband, Dad and Opa right now.
Thanks so much.

Wednesday, October 13, 2010

For my Mama

I wanted to make my Mom a special card, just because.
I didn't have a lot of time (story of my life), so I went
with a 3x3 base to start, which just may have added
to the sweetness I think ;)

I started by cutting out a heart for a mask and a template.
I taped it to the base (will not do this in the future - notice
the tear on the paper near the bottom of the heart? Ya,
good thing it's for my mom and she'll still like it...)
and then stamped the rows of hearts in Always
Artichoke, Tempting Turquoise and Tangerine Tango.
Then, using my new paper piercer (free with my
last SU! order - sweet!!) I pierced holes around the heart
for my very professional stitching guide {grin}.
I backstitched through the holes with some crochet
thread and 'Ta-Da!!' Instant sweetness.

I was able to quickly finish things off with a heart I
punched from some old SU! designer paper, the perfect
sentiment from Verve's Circular Sayings set and last,
but not least, rounded the bottom corners.

A perfectly sweet card for a perfectly sweet mom!

Saturday, October 9, 2010

Fall beauties :)


I've long admired Maille Belles clean and simple
style and these cards were an attempt to CASE one
of hers...although,somehow they didn't come out as
'clean and simple' as hers?
Oh well! I'm still pretty happy with them :)

I used Perfect Plum, More Mustard and Night of Navy
to stamp the flowers from 'Year of Flowers: Violets' (PTI).
I love how it still has a warm, fall feel without using the
traditional red, orange, yellow and brown.

I stamped Hero Arts 'Old Letter Writing' on the
purple strip in Versamark to give a bit of subtle
detail and then stitched around the main panel.
I stamped the greeting from Verve's 'Circular
Sayings' and then wrapped the front with
some twine which I had threaded some buttons
onto. I'll definitely do this again. Cute, right?

The second card is for Peter's grandma's 80th
birthday, so it needed to be a little extra special!
I ran the card front through the Cuttlebug with one
of my SU! embossing plates and then ran two strips
of Scor-Tape along the front panel. I attached the
lace to the tape by bunching it up and just sticking
it down. Easy-peasy! Another little cluster of buttons
to finish it off because a card just isn't done until
it's got a few buttons. Ha! I guess that's where
'clean and simple' just went out the window. I
seem to have a tendency to just keep adding
'one more thing'. Oh well! I'm sure grandma
will like it. And 80 years deserves some
lace and buttons, doesn't it?
{grin}
Thanks for visiting!
Hope you all are enjoying this beautiful
fall weather.
xo

Monday, September 27, 2010

Third times a charm :)

I think I finally got this card figured out!
You've seen it here and here already
but, after seeing the sweet, bright colours
of this card, I had to give it one more try.
And I'm so glad I did!


Using Tempting Turquoise, Delightful Daffodil,
Crumb Cake and Whisper White papers and ink,
I did the emboss resist technique with the
Unity flower and added the sentiment from their
'Something Within' set. A little crochet thread
and a cute little button finished it off.

I hope this card will be a cheery reminder
for its recipient that they're thought of
and prayed for in tough times...and all the time!

Saturday, September 18, 2010

For Evelyn

Another baby card...but I'm not complaining!!
I really do love making card to celebrate the
new arrival of a sweet little someone. In this case,
the card is for baby Evelyn and I couldn't resist
putting her name right on the front!


I think this might be the first time I've ever
used stickers on a card. I know, crazy eh?
I had been given these Basic Grey stickers
from the Sugar Rush line and they've been
staring at me waiting for the perfect project.
Now that I've broken them out, I'm pretty
sure these sweet alphabet stickers are going
to find their way on a lot of things around here!

I stamped the heart background in Versamark,
and used another one of my prize pack Tim
Holtz goodies for the embossed ledger sheet.
I distressed the edges and then swiped some
Milled Lavender ink over the top after I had
trimmed the edge with my SU! Scalloped Edge
punch. Another first for me was using the 'Rock
and Roll' technique on those teeny little feet.
I can't believe I've never done this before!! I
love the way it turned out -all soft and almost
watercolour-y. Overall just a sweet little card
for a sweet little princess. Perfect!

Thanks for visiting!

Tuesday, September 14, 2010

A year of blessing!

My parent's just celebrated their 32nd anniversary.
Congratulations Mom and Dad!
They had been camping and I was expecting to see them
for at least another week or so, but when Mom called
and asked if they could come over for a visit, I wasn't
about to say no! I had less than 24 hours to plan a
special little visit to celebrate such an incredible occasion.
With the help and culinary expertise of sweet farmer husband
we managed to get a delicious feast together and with the
little bit of time left I needed to make the most wonderful
card....Yipes!!! Out of all the people I make cards for, I
know my mom truly appreciates everything that goes
into them, and so I couldn't just throw something together.
Well, I was still putting the finishing touches on it when
they pulled into the driveway, but I did it!
I started by picking out some fall-ish colours.
My parent's wedding pictures are some of my favorites.
My mom had a bouquet of peachy-orange roses with
lots of fall foliage and stalks of wheat as accents. So
beautiful! I definitely had that in mind when picking
out these colours. At first I was going to run the Creamy
Caramel cardstock through an embossing folder, but
then instead stamped this Unity flourish with the matching
ink and I love the subtle detail it added. I broke out my
new SU! Lots of Tags sizzlit (love hostess benefits!) to
frame the sentiment and I love how it turned out.
The inside is stamped with the rest of the sentiment,
"...a year of blessing!". A simple but beautiful
anniversary card for my wonderful parents.
I hope every time they look at it, they are reminded of
the promises they made that fall and the love
and grace that has brought them here 32 years later!
God bless you, Mom and Dad!

In a pinch...

A couple years ago, a sweet friend gave me a
Basic Grey baby card kit for my birthday. As
much as I love designing and creating my own
cards, there are always those times, when you're
in a crunch and need a card in a jiffy and this
kit has come to the rescue every time!
I just made the last card from the kit the
other week for our friends' new baby and, even
though I had nothing to do with how it looks,
I just had to share it.
Too cute, right?

That crazy dinosaur just cracks me up!
On the inside I wrote,
"Dear Nathanial, we think you are
DINO-MITE!!
And we're so glad you're here!"

So, if you're even looking for something
to keep in your 'emergency' stash, I'd highly
recommend the Basic Grey card kits. Beautiful
papers, tonnes of awesome embellishments,
gorgeous rub-ons and super high quality
card stock and envelopes. Everything is
pre-cut and pre-scored. Easy-peasy!

Well, I've gotta go get our two oldest
ready for school. I'll tell you, I'm so
thankful that they're so excited because
I can't remember the last time I've been
so sad! Sigh. We'll get through this too!
Hope you're having a great week.
Thanks for visiting!

Monday, September 6, 2010

Back to School :(

We made these at the end of the school year,
but I think they could be an equally great way
to start the year off too!


Take some containers you've been saving, you know the
ones that get sweet Farmer Husband frustrated every
he opens the cupboard and plastic tubs and tins come
raining down upon him? Those ones. They work perfectly :)

Bake up your favorite batch of these.


Let sweet daughter decorate the tub for the best
bus driver ever!

Transform the tin with paper, ribbon and a little tag.
Easy, peasy, lemon squeesy!

Simple, inexpensive gifts that go a long way in showing
your appreciation...but make sure to bake a double
batch of the cookies otherwise you won't have enough
for the tins after you sneakily eat some yourself...I mean
you won't have any to enjoy yourself after you fill the tins ;)

Friday, September 3, 2010

A boy card!

A good friend of ours recently moved into a new
apartment and I wanted to send him a little card of
welcome for his new place.
He's a huge fan of all things Dutch so I knew I wanted
to use some orange and, being he's a guy, try and keep
the design fairly simple. I probably overthink things a
bit, but I sure had a tough time with this card!
After playing around with it a bit, I'm pretty happy
with the way it turned out though.

I used the Tim Holtz bingo impression plate (another new
goodie from my Unity prize - Wahoo!!) for the orange
background and finally broke out the Good Neighbour set
that I received from SU!'s last sale-a-bration for those
cute little houses.

Lots of distressing and dimension on this one.

Knowing how much he appreciates visual design I was
a bit nervous to send this out but he sent me a quick
message the day he got it in the mail and...he loved it!
Phew! Creating cards for guys is always a challenge for
me, but it's nice to have to step outside of the box
sometimes. Hope you're enjoying these last days of
summer! Can you believe is September already? I can't
wait to start making some crafty fall things :)

Tuesday, August 31, 2010

Look to the Lord...

Talk about getting down to the wire!
3 more hours and then....SEPTEMBER!!
Can you believe it? Not me. I am in total denial.
Anyways, before this crazy heat wave, I was feeling the
beginnings of fall and that, along with the picture from the
August challenge, totally inspired these cards.

Sorry, couldn't help myself.
I really love fall :)

Both cards are pretty similar, and totally copying the layout
and emboss resist technique I used on this card...
but I was pressed for time and figured I should
go with something that works! Switched up the colours to
go with the inspiration picture and instead of multiple colours
for the sponging I only used one. I wasn't sure how it would
turn out, but I *think* I like it.

This one is for my Mother-in-law. She was
just ordained as an elder at our church and is
feeling just a bit nervous :) I wanted to
remind her that this new role and season
in her life won't be done on her own.
I hope she can find a special place to put this
where she will remember that and be encouraged!
I added a bit of lace and some ribbon that I ruffled by
pulling on the outside threads, along the bottom, knowing
how much she enjoys those 'frilly' details.

This second card is the same, just using
a different flower stamp and simply wrapping
twine around the bottom and finishing it
off with a clear button and bow. The
recipient of this card is a bit more simple and
natural so I tried to keep it clean and crisp.
This friend is going through a season of big changes
and a lot of unknown and I thought this verse would
be very meaningful for them as well.

Anyways, I hope you enjoyed this month's challenge.
I think I may still make a little visual encouragement
for myself when I have a bit of time...I know I could
definitely use a beautiful reminder that I don't have
to do it all on my own each day. So thankful for His grace!

Can't wait to see what the rest of the Duke Divas have up
their sleeves - and our next challenge. Stay tuned for the details!
Thanks for visiting!


Sunday, August 22, 2010

My little Stamper

I just had to share this...
Gracie Jo's first 'official' creation.
This summer I got Gracie Jo her first 'real' stamp set,
'Pony Party' from SU!. The first time she saw this set in my
catalogue, she said to me "Mom!! When I grow up, this is going
to be the first stamp that I buy!!" So cute! I just couldn't resist
getting it for her. She has been such a big help to me this summer
and I knew this would be a real special way to let her know
how proud I am of her and a neat way to share something
we love together. Needless to say, she was beyond thrilled
when I gave it to her and now our stamping-together
adventures begin! Isn't she so cute? She's definitely got
the chops to be a great card-maker...I know, I know, I'm
biased, but really? Such a sweet card for her little friend!

Saturday, August 21, 2010

A Second Attempt

I just couldn't get beyond the beauty of the
card that I attempted to 'CASE' for July's HCCC
(see previous post) and so, after trying to figure out what
went wrong with the first one, I took a second stab at it.

Our friend's mother passed away this month and
while sympathy cards are never 'fun' to make, I
know from my own experience how meaningful it
it to have a handmade card sitting in the windowsill
reminding you that you are in someone's thoughts and
prayers. I hope this card will be that for our friends.

I wasn't a fan of the colours or the lace bow on my last
card, so for this one I kept things a bit more subtle.
After embossing the flower image (new rubber from my
A-MA-ZING Unity prize pack...seriously, out of this world!
I will try and take some pictures and share the goodness
with you soon. I'm still pinching myself! Unreal!),
I sponged Pale Plum, Baja Blue and Not Quite Navy on top.
I added a few butterflies from a sweet SU! embosslit and
tied some simple twine around the bottom to finish
it off. And the verdict is...I'm in love :)

I love the softness of this card and the
gentle way the butterflies seem to just be
fluttering among the flowers.
I hope it brings a bit of peacefulness
during these difficult times.


I love this saying from the SU! set 'Thoughts and Prayers'.
The inside looked a bit stark with just the sentiment though,
so I stamped another flower image (in Versamark)
from the 'Insightful Meadows' Unity set to add a
softer touch. I love the way it turned out!

How are you're August challenge creations
coming? I have lots of ideas 'fluttering' around
in my head...now, just to find the time and energy
to get them on paper! Happy stamping friends :)

Sunday, August 15, 2010

Better late than never???

So, after many not-so-subtle promptings from
my fellow divas, here is my submission for July's HCCC.
Yes, I know August is half-way over, but
better late than never is what they say.
However, in this case,
I'm not sure that is actually true.
This one may have well been better off as a never.


I'm not sure if I'm just not digging the colour combo,
the poufy lace bow, or that I just can't get the epic
gorgeousness of the card I CASE'd out of my head,
but this card definitely falls into the 'failed attempts' category.

Hopefully, my mojo will find its' way back to me, as I have
a whole bunch of cards on the waiting-to-be-made list.
I'll do my best to keep more up-to-date here on the blog-o.
Thanks for not giving up on me! Looking forward to your
visits and comments again. Take care!!

Sunday, June 20, 2010

Happy Father's Day!

Well, Father's Day has been a little bit of a bust over here
at the Scrapyard. Our two-year old picked up a bug
and has been a lean, mean, puking, pooping machine
the past couple days. I had grand plans for celebrating all
the dads in my life, but instead have been doing lots of
laundry, cleaning up vomit and keeping our little guy
entertained and away from the carpets :)
Thankfully I had at least made all our Father's Day
cards ahead of time so they were ready for today.

Unfortunately, when my husband went to visit my parents
this morning I forgot to give him my dad's card...
Thankfully, since I took a picture of it to put up here
on the blog-o, I can still send my dad some virtual lovin'
today until he gets the real deal in the mail later this week!

Anyways, I tried to keep things pretty simple. I did use
some ribbon, but no bows for the men! And I added some
lines along the bottom with the scoring blade in my paper cutter.
I like the added detail without getting too frou-frouish.
(Is frou-frouish a word?) I stamped the word "BLESSED"
from a retired SU! set in versamark and heat embossed it
with white powder and then sponged over top in Old Paper
and Baja Breeze. The inside of the card says ''...to have a dad
like you." I don't always like adding my own handwriting
to cards, but sometimes you just need a sentiment that fits!
And I truly do feel blessed by my husband, dad, dad-in-law,
and our two grandfathers. We are definitely celebrating them
today...even if it's with a barf bowl on couch :)
Happy Father's Day.

Wednesday, June 16, 2010

Hoo-ray, it's your Birthday!!

It was Dad's birthday on Friday, so another manly-man
card was in order:

To make the background paper, I rubbed distress ink right
onto my embossing plates (yes, it was scary) and then
ran them through my Cuttlebug with the script stamped paper.
Afterwards I flicked water onto the paper, although I think
next time I will try spraying the water directly onto the embossing
plates as well. Regardless, I really like the rustic/textured look I got.


For his gift we got him a gift certificate to
a local tree farm, so I created this 'envelope'
to give it to him in.

This is the tag inside the envelope and the
bands at the bottom are actually a little
pouch that held the gift certificate. I was
really happy with the way it turned out and
I think it's nice to add that personal touch instead
of just giving a plain, boring envelope...not that
Dad would've really cared either way. Hee!
But I had fun making it, so I just look at is as
a double bonus: birthday card and gift for Dad,
play time in the Scrapyard for me. Check! Check!

Thanks for stopping by, have a great day!