Friday, February 1, 2013
A little Somethin' Somethin'
I needed a quick card for a bridal shower. It needed to be good because the recipient is a fellow cardy but, as per usual, I left things till the last minute and so was making this the morning of the shower. I had pinned this card and was going to try and replicate it but I didn't have any frames. I know I could've cut one out myself but I literally had 10 minutes to finish things up. So when I found the little somethin' somethin' stamp in my stash ( I think it's an old hostess set from SU!) I knew I had to use it and I went from there. Some stamped hearts (SSS Music 2 My Ears) and punched hearts (SU! patterned paper and punch) on a simple kraft base. I adhered the tag with some foam dots and tied on a teeny bit of floss and - DONE!! Even though it's different than what I had started out to make, I'm thankful for the inspiration that gave me a starting point to work with. And now I've got another great layout for the next time I need a card in less than 10 minutes because, let's be honest people, don't we all work better under a little bit of pressure? ;)
Happy stamping!
Tuesday, January 29, 2013
Home Ec Class
A couple weeks ago I did a short Bible study on being an encourager along with a cardmaking class for our homeschool group's 'Home Ec' class. I had eight girls, aged 10-14, over along with some of their moms and big sisters. I did my best to channel my 'inner Margaret' (best demo ever!!!) as I showed the girls some cardmaking basics and, boy oh boy, did we have fun! Such a creative group of girls - I really loved watching them take the skills/ideas I showed them and then seeing them put their own spin on things. Since I knew some of the girls would be new to stamping and didn't want them to feel like they needed to own a huge arsenal of supplies to create cards, I created 2 projects using simple craft/recycled supplies.
The first card used small circles cut or punched from paper scraps and a simple sentiment. I encouraged the girls to use things like old magazines, kleenex boxes or pretty packaging instead of buying patterned paper. For my example card, I used scraps I had from My Minds Eye Dilly Dally collection. I love being able to use the smallest of scraps to make a great card like this!

For the second card I used my kids' poster paint and dipped the eraser from a plain old pencil into the paints to make the coloured dots. So fun!! Can you imagine all the awesome colour combos and designs you could do with this? The sentiment panel was a happy accident - I had originally stamped the sentiment directly on the card base...but smudged it. So in order to cover it up, I re-stamped and embossed it on the turquoise cardstock and then taped it on with some washi tape that was sitting out on my desk. Love it!! Some of the girls even stamped the sentiment using paint, which looked a-ma-zing!
Anyways, it was super fun doing this class with the girls - and the cleaning, organizing and prep I had to do totally got me back into stamping mode!! Double bonus :) Anyways, I'm hoping I won't lose my momentum and will keep making time to create cards and encourage others. A simple card is such an easy way to let someone know you are thinking of them, praying for them or grateful for something they've done. I think cardmaking is such a great hobby because as we enjoy creating cards we can also bless others as we give them away. So simple and yet so cool. I'm working on a set of cards to give to some older widows in our church whom I know have a hard time with these long, dark, winter days. A little bit of sunshine in an envelope :) Maybe you know someone that could use a little pick-me-up? Send them a card! Happy stamping!
"Therefore encourage one another and build each other up, just as in fact you are doing." 1 Thess.5:11
The first card used small circles cut or punched from paper scraps and a simple sentiment. I encouraged the girls to use things like old magazines, kleenex boxes or pretty packaging instead of buying patterned paper. For my example card, I used scraps I had from My Minds Eye Dilly Dally collection. I love being able to use the smallest of scraps to make a great card like this!
For the second card I used my kids' poster paint and dipped the eraser from a plain old pencil into the paints to make the coloured dots. So fun!! Can you imagine all the awesome colour combos and designs you could do with this? The sentiment panel was a happy accident - I had originally stamped the sentiment directly on the card base...but smudged it. So in order to cover it up, I re-stamped and embossed it on the turquoise cardstock and then taped it on with some washi tape that was sitting out on my desk. Love it!! Some of the girls even stamped the sentiment using paint, which looked a-ma-zing!
Anyways, it was super fun doing this class with the girls - and the cleaning, organizing and prep I had to do totally got me back into stamping mode!! Double bonus :) Anyways, I'm hoping I won't lose my momentum and will keep making time to create cards and encourage others. A simple card is such an easy way to let someone know you are thinking of them, praying for them or grateful for something they've done. I think cardmaking is such a great hobby because as we enjoy creating cards we can also bless others as we give them away. So simple and yet so cool. I'm working on a set of cards to give to some older widows in our church whom I know have a hard time with these long, dark, winter days. A little bit of sunshine in an envelope :) Maybe you know someone that could use a little pick-me-up? Send them a card! Happy stamping!
"Therefore encourage one another and build each other up, just as in fact you are doing." 1 Thess.5:11
Monday, January 28, 2013
Sparkly snowflakes
December didn't include very much card-making for me this year. In fact, I only managed to squeak out a measly two cards - one for a wedding and one Christmas card. That's right folks, I only made ONE Christmas card this year. Somehow we all still managed to survive. And, I'm thinking, that things can really only go up from here, right? Anyways, both cards were snowflake-themed and used some new stamps in my stash, so that was pretty fun. The first card, for the wedding, turned out okay. I used their wedding colours, blue, white and silver, but I think I may have gone a bit overboard...
I dry embossed the navy background panel with snowflakes and rubbed white ink over it, which really made the snowflakes pop, but I think it kinda overdid things. If I made this card again, I would definitely leave the embossed navy paper alone.
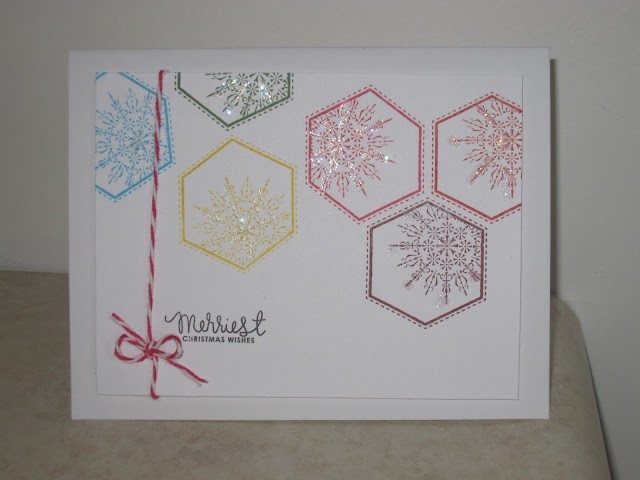
Onto my most favorite card...maybe ever!? This was the sole Christmas card that was made this year and, boy, did I love it! :) I'm definitely tucking this design away for future inspiration. The hexagons and sentiment are from Simon Says Stamp's Holiday Apothecary Labels, a super cute set that is not only good for Christmas but all kinds of sweet wintery cards. I was drawn to the set because of its' versatility...and the cute matching dies that go with it! I have to say, these are my first SSS stamps and I LOVE THEM! They pick up ink really well, stamp a beautiful image and have the feeling of my favorite red rubber stamps - but are CLEAR! Definitely excited to add some more SSS stamps to my arsenal in the future :) I added a touch of glitter to the snowflakes that gave the card just that little extra something and finished it with some hot pink baker's twine. Super fun card to make!
I cleaned up my stamping desk earlier this month, which has definitely inspired me to get more creative and inky again. So, hopefully, I'll be back soon with some more cards to share. Thanks for stopping by! xo
...it just seemed a little 'busy' to me. I used snowflakes from Bo Bunny's Powder Mountain set
and embossed the largest one in silver. The sentiment is from an old Unity kit of the month and
worked out pretty swell because, unbeknownst to me, the bride really likes U2 :)
I dry embossed the navy background panel with snowflakes and rubbed white ink over it, which really made the snowflakes pop, but I think it kinda overdid things. If I made this card again, I would definitely leave the embossed navy paper alone.
Onto my most favorite card...maybe ever!? This was the sole Christmas card that was made this year and, boy, did I love it! :) I'm definitely tucking this design away for future inspiration. The hexagons and sentiment are from Simon Says Stamp's Holiday Apothecary Labels, a super cute set that is not only good for Christmas but all kinds of sweet wintery cards. I was drawn to the set because of its' versatility...and the cute matching dies that go with it! I have to say, these are my first SSS stamps and I LOVE THEM! They pick up ink really well, stamp a beautiful image and have the feeling of my favorite red rubber stamps - but are CLEAR! Definitely excited to add some more SSS stamps to my arsenal in the future :) I added a touch of glitter to the snowflakes that gave the card just that little extra something and finished it with some hot pink baker's twine. Super fun card to make!
I cleaned up my stamping desk earlier this month, which has definitely inspired me to get more creative and inky again. So, hopefully, I'll be back soon with some more cards to share. Thanks for stopping by! xo
Thursday, November 15, 2012
Keeping up with the...Hoogkamps?
This place has been quiet for far too long! The addition of a sweet little pumpkin to our family seems to have seriously affected my crafting time and put all my creative energies on hold :( Never fear though! At the nagging insistence kind encouragement of my dear friend, I am determined to get back into my stamping groove. I looked back in my folders and since Katie's birth, I made a grand total of 7 cards. That's one card per month - not so good. I hereby declare to at least double that from here on (I know, I'm not overly ambitious but I've learned it's better to keep my expectations low. That way I don't disappoint myself and am constantly exceeding my hopes. Win - win!!). So here's the card I made in June. I think it was a thank you card for someone...but I honestly can't remember. That's what happens to me when I only get 4 hours of interrupted sleep at night - all my cognitive thinking goes seriously downhill. I got the "Rosie Posie" stamp set from PTI in the spring and this was the first time I'd pulled it out. I had my eye on it for the longest time and, let me tell you, it did not disappoint. I can't wait to play with this set some more!! So here's to more card-making, more sleeping (are you reading this Katie? I'll send you the memo.), and more craftiness in The Scrapyard again. Can I get a 'What?!What?!'
Stamps: Rosie Posie, Signature Greetings (PTI), Musical Background (Unity)
Paper and Ink: SU!
Punch: Decorative Label: SU!
Stamps: Rosie Posie, Signature Greetings (PTI), Musical Background (Unity)
Paper and Ink: SU!
Punch: Decorative Label: SU!
Sunday, April 1, 2012
A Canvas
The kids were painting spring canvases for a school
project this past week and I couldn't help but join in!
It was so fun :)
I painted the canvas with water colours (obviously, I need
more practise...my technique leaves much to be desired. I'm
not a fan of the places where I over-watered and the red ran
into the turquoise :P) But, as in all crafty endeavors, when you
make a mistake you just gotta go with it. Forces you to be even
more creative! So, in an attempt to distract (cover-up) the mess
I decided to add some things on top of the painting. I cut the
birds out of some sheet music using my Cameo (can we stop and
discuss how much I love that thing?!) and the black swirlies and
text are from some uber-old rub-ons I had in my stash. I
mod-podged everything together and, while it's not perfect,
I'm still pretty happy with it and I love the fun, whimsical
look it adds to our walls. Definitely need to make more time
for creating things like this, just for fun!
Thanks for stopping by! Make some time to get crafty
this week - you'll be glad you did!
It was so fun :)
I painted the canvas with water colours (obviously, I need
more practise...my technique leaves much to be desired. I'm
not a fan of the places where I over-watered and the red ran
into the turquoise :P) But, as in all crafty endeavors, when you
make a mistake you just gotta go with it. Forces you to be even
more creative! So, in an attempt to distract (cover-up) the mess
I decided to add some things on top of the painting. I cut the
birds out of some sheet music using my Cameo (can we stop and
discuss how much I love that thing?!) and the black swirlies and
text are from some uber-old rub-ons I had in my stash. I
mod-podged everything together and, while it's not perfect,
I'm still pretty happy with it and I love the fun, whimsical
look it adds to our walls. Definitely need to make more time
for creating things like this, just for fun!
Thanks for stopping by! Make some time to get crafty
this week - you'll be glad you did!
Faux watercolour and an Easter bunting
I needed a sympathy card for some friends of ours. These
are always a bit hard to make because I want them to be extra
special and meaningful. I used the set 'Thoughts and Prayers', one
of my favorites for letting people know you care. SU's latest
sale-a-bration catalogue had a beautiful card that I knew would
be perfect for this card's recipient, so I used pretty much the same
layout and colour scheme with a couple little changes. Here's the result:
special and meaningful. I used the set 'Thoughts and Prayers', one
of my favorites for letting people know you care. SU's latest
sale-a-bration catalogue had a beautiful card that I knew would
be perfect for this card's recipient, so I used pretty much the same
layout and colour scheme with a couple little changes. Here's the result:
I think my favorite part of this card, though, is the stamped image.
I first inked the stamp up with Certainly Celery ink, then carefully
wiped off the flowers with a baby wipe. I re-inked them with Almost
Amethyst and then sprayed the whole stamp with water from a
mini-mister. When I stamped it, it really gave the image a soft,
water-coloury look. Love, love, love how this turned out!
We've also been up to lots of crafty goodness as we get ready
to celebrate Easter. Last week I made a little mini-bunting
to hang from our kitchen shelf. I used old book pages for the
individual banners and then various Basic Grey scraps and
stickers, along with lots of punches, to decorate them.
I first inked the stamp up with Certainly Celery ink, then carefully
wiped off the flowers with a baby wipe. I re-inked them with Almost
Amethyst and then sprayed the whole stamp with water from a
mini-mister. When I stamped it, it really gave the image a soft,
water-coloury look. Love, love, love how this turned out!
We've also been up to lots of crafty goodness as we get ready
to celebrate Easter. Last week I made a little mini-bunting
to hang from our kitchen shelf. I used old book pages for the
individual banners and then various Basic Grey scraps and
stickers, along with lots of punches, to decorate them.
'He is Risen'
I'll be back soon to share some more.
We've been crafty little crafters the past couple weeks.
Makes me very happy :)
I'll be back soon to share some more.
We've been crafty little crafters the past couple weeks.
Makes me very happy :)
Monday, March 12, 2012
It's a boy!!
One of my dearest friends just had her first baby - the
sweetest little guy I've ever seen! Here's the card I made
to celebrate the new addition:
Versamark to add a little bit of detail to the Kraft. The colours
of the card match Johann's nursery perfectly - maybe they'll
put this card in there to add to the decor? :)
And, because he's seriously the cutest little thing in the world,
here's a picture of my new 'nephew' and his awesome parents:
I made another card using the same layout and papers
for an energetic six-year old's birthday. With a 'Happy
Birthday' sentiment and an awesome robot diecut along
the middle panel, it turned out super cool. Unfortunately,
I forgot to take a picture, so you'll just have to take my
word for it. Hee! Seriously though, it was super speedy
to make a second card using the same supplies and just
mixing things up a bit. I'll definitely do that again! Just
something to think about...
Happy stamping!
Subscribe to:
Posts (Atom)